Posts

Showing posts from 2012

Navagraha Temples - Route Map (Powered by Google)

This is the guide for visiting all 9 Navagraha stalams from Kumbakonam. This map starts from kumbakonam. The following is the order of Stalams. Start point is Kumbagonam: (A) Thingaloor Chandiran temple(B) Alagudi Guru temple(C) Thirunageswaram Raghu temple(D) Suriyanar Temple(E) Kanjanoor Sukiran temple(F) Vaitheswaran temple for Chevvai(G) Thiruvengadu Budhan temple(H) Keezha perumpallam Kethu temple(I) Thirunallaru Sani temple(J) End your journey at Kumbakonam(K). Route Map Short URL: http://goo.gl/maps/iugZJ View Larger Map See the pdf file for route map Alternate way from Kumbakonam is as follows From Kumbakonam-A Thingalur Chandiran stalam-B Alagudi Guru stalam-C Thirunallaru Shani stalam-D Keezha perumpallm Kethu stalam-E Thiruvengadu Budhan stalam-F Vaitheeswaran koil Chevvai stalam-G Kanjanoor Sukiran stalam-H Suriyanar stalam-I Thirunageswaram Raghu stalam-J End point Kumbakonam.-K Short URL: http://goo.gl/maps/Ruf5O  View Larger

NAVAGRAHA TEMPLES - நவகிரக தல யாத்திரை வழிகாட்டி

NAVAGRAHA TEMPLES நவகிரக தல யாத்திரை வழிகாட்டி GNAYIRU – SUN – SOORIYANAR KOIL- சூரியன் Moolavar: Sri Kasi Viswanathar The first Navagraha temple is the Suryanar Koyil. It is situated in the small village called Tirumangalakkudi of Tamil Nadu. Thirumangalakudi is located just one Kilometer north of Aduthurai, which lies in between Kumbakonam (15.km) and Mayiladuthurai(20.km) on the bus route as well as Train route. Devotees visit this temple to offer remedies for the bad effects of the sun and all other planets. It is an exclusive shrine dedicated to the Sun God and was built during the Chola period. Pilgrims worship Lord Siva – Sri Prananathar and Goddess Sri Mangalambigai at Thirumangalakudi and then go to Suriyanarkoil to worship Navagrahas. In Suriyanarkoil the sun is the main deity and other grahas are installed in separate sanctums. MAP URL: http://goo.gl/maps/Kp6Oo View Larger Map THINGAL – MOON - CHANDHIRAN – THINGALUR - சந்திரன்

How do I share folders in Windows 7 with the Shared Folder Wizard?

Image
By  Jack Wallen October 6, 2010, 12:21 PM PDT Takeaway:  Jack Wallen shows you how to use the Microsoft Windows Shared Folder Wizard to create folders that can be shared with colleagues across the network. If you work in any kind of environment where there are multiple users, chances are you will need to share one or more folders with your colleagues. For many administrators, this is a very simple task. For some, however, this task seems to be rather elusive. And what happens when you want to give your end users the ability to share the necessary folders to everyone? Are you going to walk through the sometimes complicated task of folder sharing? Or what about training your junior admins on the art of folder sharing? For those end users (or even for some administrators with less knowledge of such tasks), there is a very easy-to-use  Microsoft Windows  Wizard for sharing folders. This wizard is the Shared Folder Wizard, and it is included in Windows XP Pro, Vista, and  Windo

TDS - RPU (Return Preparation Utility) and Windows 7

Image
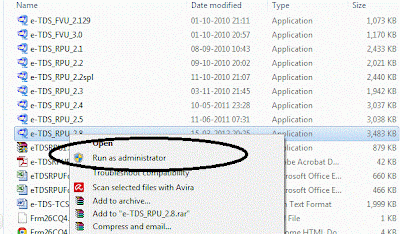
Follow below steps :- 1.  You must have Administrator rights 2. Go to Control Panel -> User Accounts -> Click on "Change User Account Control Settings" 3.  Set to "Never Notify" 4.  Now re-install your software and you will be able to install successfully.. How to install NSDL RPU in Windows 7  Now-a-days,  Windows 7 is operating systems in new computers.    Installation of NSDL e-tds R.P.U.  in windows 7 requires some knowledge for installation.   A person who knows "Run as Administrator " do not face any difficulty in installation.  Two times "Run as administrator" is required for proper installation.  Right click on the step up file and use Run as Administrator. at the time of installation of setup. First time running of R.P.U.     

Recovering files on flash/pen or external drive changed to shortcuts

If you did not format your flash drive, then check whether the files are not in hidden mode. Plug your drive now Click on “Start” –> Run–> ( Press Window key + R ) type cmd and click on OK. Enter this command. attrib -h -r -s /s /d g :*.*       Here  g is the drive letter. It varies, you can get this letter in My computer  Press Enter Now check for your files in on the pen drive Delete the unnecessary shortcuts. Note: Replace the letter g with your flash drive letter.

The Internet Explorer icon is missing from your desktop

Method 1: Create a shortcut to Internet Explorer on your desktop Important Windows 7 no longer supports the ability to modify the registry to get the special Internet Explorer icon to appear on your desktop. This change was made to ensure Internet Explorer could be removed easily for compliance reasons. The only way to add the Internet Explorer icon to the desktop in Windows 7 is to create a shortcut. To create a shortcut to Internet Explorer on your desktop, follow these steps: Click Start, and then locate the Internet Explorer icon on the Start menu. If you do not see the Internet Explorer icon on the Start menu, look in the Programs or the All Programs folders on the Start menu.Note If you cannot locate the Internet Explorer icon on the Start menu, follow these alternative steps or, if you are not using Windows 7, use Method 2 . Right-click and drag the Internet Explorer icon from the Start menu to your desktop, and then click Create Shortcuts Here, or click Copy Here.A shortcu

AHCI - RAID vs IDE HDD - Boot failure issue

Installing AHCI driver in Windows after the installation of Windows XP results in boot failure. You can get PXE error or "No boot device could be detected" messages or continuous Restart may happens while you boot your system in Windows XP. The solution for this issue is change the SATA mode in the BIOS from AHCI to IDE. You can access the BIOS settings by hitting F2 while BIOS is loading. Change the HDD SATA mode from AHCI(usually called RAID by Intel) to IDE. Change first boot disk priority to HDD, then DVD/CD, then Network, etc. Before exiting from BIOS press F10 to save this changes and reboot the system. The OS will loaded. Thnaks

Optimal MTU size for Router Settings in Partial loss of internet connection

General instruction for finding your optimal MTU size Go to Start and select Run. Set router to MTU 1500 to start with. Start RUN Type in cmd (Windows 2000/XP/Vista/7) or command (Windows 98/ME) into the box . Hit the enter key or click OK At the DOS prompt, type in ping bbc.co.uk -f -l 1492 and hit the Enter key. If you get the response "Packet needs to be fragmented but DF set", lower the size the packet in increments of +/-10 (e.g. 1472, 1462, 1440, 1400) until you have a packet size that does not fragment. Now increase the packet size from this number in small increments until you find the largest size that does not fragment. Add 28 to that number (IP/ICMP headers) to get the optimal MTU setting. For example, if the largest packet size from ping tests is 1462, add 28 to 1462 to get a total of 1490 which is the optimal MTU setting and can be put in your router's settings! Hope this helps some of you!? Source : NETGEAR site.

Intel Centrino Wireless-N : Slow internet connection

Image
When the system connected to the router in wired mode we can get the very good internet speed. The Problem identified with Intel Centrino Wireless-N 1030 and 6230 adapter with Bluetooth has low internet speed when we connect the Laptop to ADSL2+ Modem Wireless-N router. This type of router can support upto 150/300 mbps in Wireless - N mode. The network icon in the task bar shows that the system has intenet access or limited connectivity. But you may experience very low speed internet. This is very specific to the wireless -N adapter 1030 and 6230. Solution: In the router side Open the router by entering the default IP of router 192.168.0.1 or 192.168.1.1 user: admin password: password Under setup select the wirless settings page In the mode section select g & b as mode and save this configuration and logout the router and reconnect the laptop with router in wireless mode. Now U can have the very good browsing experience in the 802.11g mode even with laptops with Wirele